
Beginner Guide To Sending Emails using Django & SMTP
In this article, we’ll take a look at how to setup Django to send email using SMTP. It’s quite simple to send emails using Django. I’ll walk you through the procedures in this brief tutorial so you can set up your Django application, and start sending emails right away.
In a Django application, sending emails is most frequently used for account activation, password resets, and delivering general alerts about your project.
Django also has tools for emailing error reports. It’s fantastic at first. But eventually you’ll see that it may get rather spammy. especially if a lot of people use your program.
The ability to send emails through websites is a nice feature since it improves the user experience. We can improve user communication. Look at Amazon.com, and Facebook.com, which send emails with their tailored offers. Everything revolves around emails that a server generates.
Let’s now study how to use Django to send emails, and add email sending functionality to our Django web app. The SMTP (Simple Mail Transfer Protocol) service, which is a built-in package in both Python and Django, can be used to send emails in Django.
What Is SMTP?
- Simple Mail Transfer Protocol (SMTP) is a service that allows senders and receivers to send, receive, and/or relay outgoing mail.
- Your customer email address (you may optionally provide several email addresses) is entered into the SMTP service and is formatted as smtp.gmail.com because, for example The SMTP servers for Gmail and Twilio Send Grids are respectively smtp.gmail.com and smtp.sendgrid.com. Typically, the account or settings part of your mail client is where you may locate the address of your SMTP server.
Requirements
To begin sending transactional emails the right way, we will use a third-party service known as SendGrid, you will need:
An established domain
Almost any email provider, including a Gmail account, may be used using SMTP. It is often not a smart idea because the Gmail service was created to be used as a personal email account, and does not anticipate you sending a lot of emails quickly. But if you’re simply trying it, that’s perfectly OK. Nevertheless, there are more effective ways to test the emails your program sends in a testing environment.
It’s never easy to choose how to give a web application email sending capabilities. Which would you prefer—setting up and managing your own email server, or using a third-party email service? Although the answer depends on a number of factors, including the amount of emails you send, your hosting platform, and your budget, there is a tendency to favor the simplicity provided by a dedicated email server.
Therefore, for this tutorial, we’ll use SendGrid’s free plan, which lets you send 100 emails for free each day. That should be enough for you to get going with Django email system.
SendGrid Account Configuration
You must first establish an API key that you will need to authenticate with SendGrid before you may send email using the service. Enter your SendGrid account login information, choose Settings from the left sidebar, and then choose API Keys. In the end, click “Create API Key.”
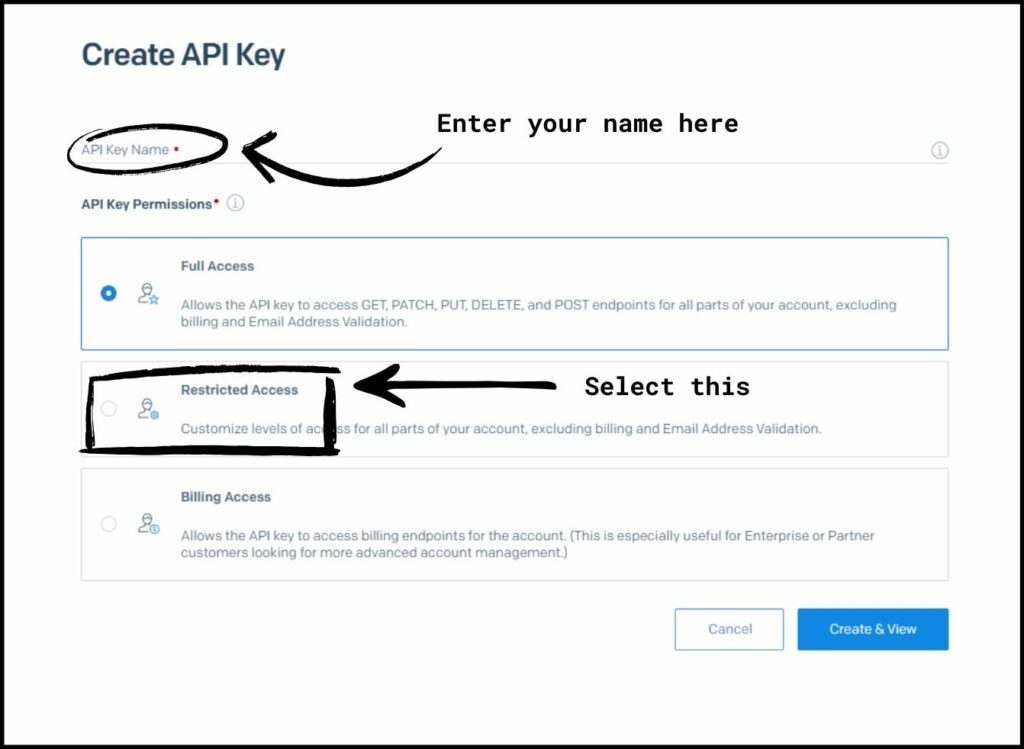
You must give your API key a human-sounding name. I decided to use the name Django for this tutorial. I chose “Full Access” for permissions, enabling the key to carry out all required email sending operations. Select “Restricted Access” and adjust your access settings if you like to produce keys with highly precise rights.
Your key will be displayed when you select “Create & View” from the menu. You must click on this key to copy it to your clipboard and then paste it into a protected document so that you may use it later since it won’t ever be displayed again. You’ll have to make a new key if you misplace your current one. You may choose “Done” once you have saved your key.
Configuring Django SMTP Credentials
The good news is that Django fully supports SMTP interface, which we can use to send emails. Sendgrid supports access to their services using SMTP, and provides the appropriate credentials to you for that. Add the following variables to your settings.py file’s to set up Django to send emails using SendGrid. This file is placed under app/settings.py in my instance, but if you gave your Django application an other name, it may be somewhere else.
EMAIL_HOST = 'smtp.sendgrid.net'
EMAIL_PORT = 587
EMAIL_USE_TLS = True
EMAIL_HOST_USER = 'apikey'
EMAIL_HOST_PASSWORD = os.environ.get('SENDGRID_API_KEY')
As you can see above, the following parameters are necessary in order to utilize the SendGrid SMTP interface.
The mail server should be
smtp.sendgrid.netThe mail port should be
587(port 25 is also supported, if you prefer)TLS must be enabled
Authentication is required. For the username you must use
apikey(this is the same for all SendGrid accounts). The password is the SendGrid API key that you created in the previous section.
Send Email Using Django
You can now send a test email to yourself. This can be done by utilising the manage.py file of your Django project. Launch a Python shell, and do the following command.
python manage.py sendtestemail <email_address>Once you’ve confirmed that you’ve received the test email, and all the configuration for the Django app was done correctly. You can basically use the following code snippet anywhere within your Django app to send emails.
from django.core.mail import send_mail
send_mail('Example Subject', 'Example message', 'from@example.com', ['to@example.com'])
The email topic, content, sender, and list of recipients are the inputs in the call to the send mail() method above. If all goes according to plan, an email should be in your inbox shortly, after this function gets executed.
Conclusion
In this article, we took a look at how to configure our Django app to send emails. We took a look at how to setup the SMTP settings for our Django app using SendGrid. Furthermore, we took a look at how the sendtestemail, and send_mail function could be used in our Django application to send email. Now you should feel at ease dealing with scenarios where you’r required to send emails using your Django app. As always, If you have found this article useful do not forget to share it and leave a comment if you have any questions. Happy Coding 🙂


Leave a Reply