
The integration of AI capabilities within mobile applications offers a range of exciting opportunities. One such example is creating a chat app that leverages the power of Google’s Gemini API and Flutter. This tutorial will guide you through the process, from setting up the project to implementing functionalities for text and image-based interactions with the Gemini API.
In this tutorial, we will build a comprehensive AI-powered chat application using Flutter and Google’s Gemini API. We’ll cover everything from project setup to coding, ensuring a seamless experience for the end-user.
Setting Up the Project
Adding Dependencies
To get started with the “gemini app flutter,” you need to add the relevant dependencies to your Flutter project. These include flutter_gemini, image_picker, and dash_chat_2 packages. These packages will facilitate communication with the Gemini API, media selection from the device gallery, and rendering the chat interface respectively.
- flutter_gemini: This package will enable us to interact with the Google Gemini API effortlessly. To get the dependency click here.
- image_picker: This package allows us to pick images from the device’s gallery. To get the dependency click here.
- dash_chat_2: This package provides a comprehensive UI for chat applications. To get the dependency click here.
Add the following dependencies in your pubspec.yaml file:
dependencies:
  flutter:
    sdk: flutter
  flutter_gemini: ^2.0.4
  image_picker: ^1.1.2
  dash_chat_2: ^0.0.21
Run flutter pub get to get the dependencies.
flutter pub getGetting the Gemini API Key
To interact with Google’s Gemini API, you need an API key. Here’s how to get it:
- Visit the Google Gemini API page and apply for an API key.
- Google offers a generous free tier with unlimited requests, limited to 60 requests per minute. For more than 60 requests per minute, you might need to opt for a pay-as-you-go plan.
Steps to create an API key:
- On the Google AI for Developers page, click on the “Learn more about the Gemini API” button.
- Next, click on “Get API key in Google AI Studio”.
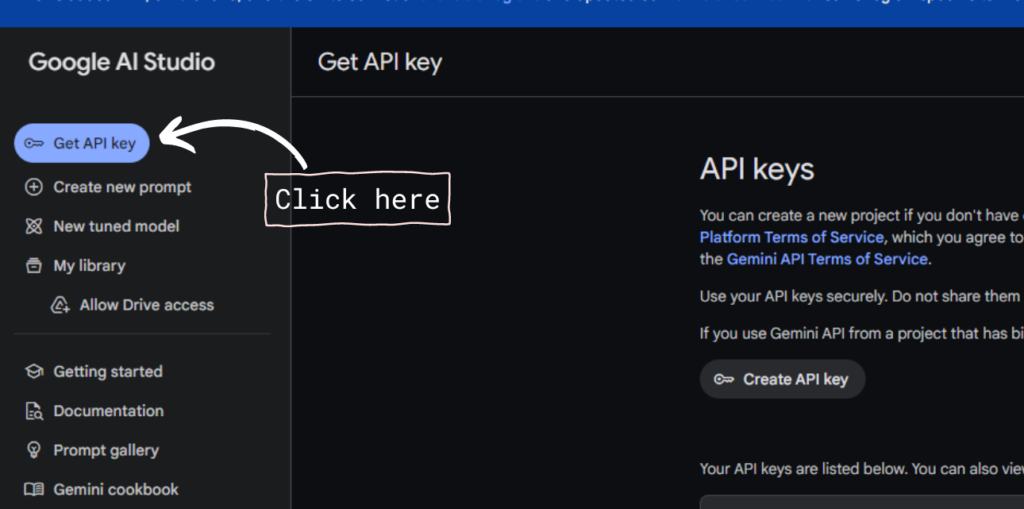
- Click on the “Get API Key” button positioned on the top left of the screen
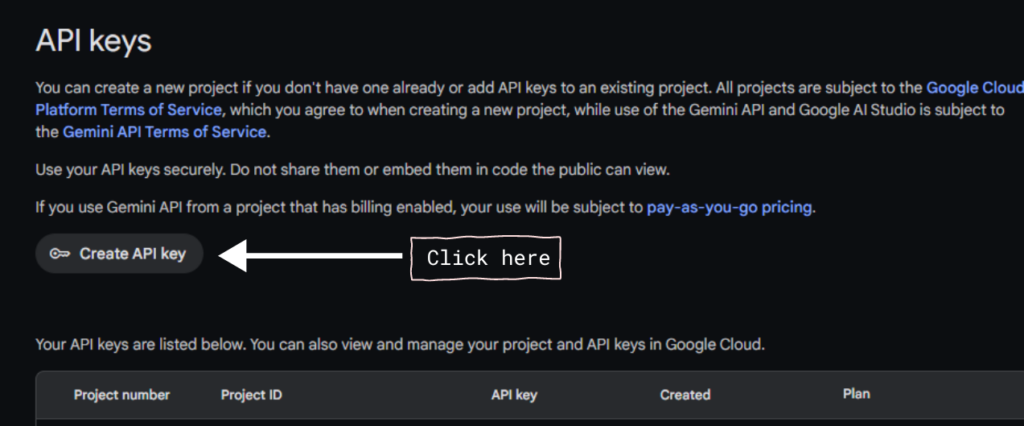
- Click on the “Create API” button and select a project to generate an API.
Store the API key securely. Create a new file named constants.dart in your lib folder and add your API key:
const String GEMINI_API_KEY = 'your_api_key_here';Initializing the Gemini Instance
After obtaining the API key, initialize the Gemini instance in the main file:
import 'package:flutter/material.dart';
import 'package:flutter_gemini/flutter_gemini.dart';
import 'constants.dart';

void main() {
  final gemini = Gemini.instance;
  gemini.init(apiKey: GEMINI_API_KEY);
  runApp(MyApp());
}
Ensure you import necessary packages and initialize the Gemini instance using the API key stored in constants.dart.
Creating the UI
Building the Home Page
Start by creating a stateful widget for the home page and setting up a basic scaffold structure.
class HomePage extends StatefulWidget {
  @override
  _HomePageState createState() => _HomePageState();
}

class _HomePageState extends State<HomePage> {
  @override
  Widget build(BuildContext context) {
    return Scaffold(
      appBar: AppBar(title: Text("Gemini Chat")),
      body: buildUI(),
    );
  }

  Widget buildUI() {
    // UI building code will go here.
  }
}
Setting Up the App Bar
For a better user experience, configure the app bar with a custom title.
appBar: AppBar(
  title: Text("Gemini Chat"),
),
Rendering the DashChat Widget
Use the DashChat widget to implement the chat interface. Define the current user and the Gemini user for differentiation between sent and received messages.
import 'package:dash_chat_2/dash_chat_2.dart';

class _HomePageState extends State<HomePage> {
  final ChatUser currentUser = ChatUser(
    id: '0',
    firstName: 'User',
  );

  final ChatUser geminiUser = ChatUser(
    id: '1',
    firstName: 'Gemini',
    avatar: 'profile_image_url',
  );

  List<ChatMessage> messages = [];

  @override
  Widget build(BuildContext context) {
    return Scaffold(
      appBar: AppBar(title: Text("Gemini Chat")),
      body: DashChat(
        currentUser: currentUser,
        onSend: sendMessage,
        messages: messages,
      ),
    );
  }

  void sendMessage(ChatMessage chatMessage) {
    // Logic for sending messages will go here.
  }
}
Implementing Text Chat
Handling Send Message Events
When the user sends a message, add their message to the chat and simultaneously send it to the Gemini API:
void sendMessage(ChatMessage chatMessage) {
  setState(() {
    messages.insert(0, chatMessage);
  });
  // Handle sending message to Gemini API
}
Streaming Gemini’s Response
To provide a seamless chat experience, handle real-time responses from the Gemini API:
void sendMessage(ChatMessage chatMessage) {
  setState(() {
    messages.insert(0, chatMessage);
  });

  try {
    final responseStream = gemini.streamGenerateContent(
      text: chatMessage.text,
    );

    responseStream.listen((event) {
      if (messages.first.user.id == geminiUser.id) {
        setState(() {
          messages.first.text += event.content.parts.fold(
            '',
            (previousValue, element) => previousValue + element.text,
          );
        });
      } else {
        setState(() {
          messages.insert(0, ChatMessage(
            text: event.content.parts.fold(
              '',
              (previousValue, element) => previousValue + element.text,
            ),
            user: geminiUser,
          ));
        });
      }
    });
  } catch (error) {
    print("Error in streaming response: $error");
  }
}
Implementing Image Chat
Adding an Image Picker Button
Modify the input options to include an image picker button, allowing users to pick an image from their gallery:
DashChat(
  currentUser: currentUser,
  onSend: sendMessage,
  messages: messages,
  inputOptions: InputOptions(
    trailing: [
      IconButton(
        icon: Icon(Icons.image),
        onPressed: sendMediaMessage,
      ),
    ],
  ),
)
Implementing the Send Media Message Function
Define a function to handle picking an image and sending it as a message:
Future<void> sendMediaMessage() async {
  final ImagePicker _picker = ImagePicker();
  final XFile? file = await _picker.pickImage(source: ImageSource.gallery);

  if (file != null) {
    final message = ChatMessage(
      user: currentUser,
      createdAt: DateTime.now(),
      text: "Describe this picture",
      medias: [
        ChatMedia(
          url: file.path,
          type: MediaType.image,
        )
      ],
    );

    sendMessage(message);
  }
}
Sending the Image to Gemini API
Extend the sendMessage method to handle image messages and pass the image bytes to the Gemini API:
void sendMessage(ChatMessage chatMessage) {
  setState(() {
    messages.insert(0, chatMessage);
  });

  if (chatMessage.medias.isNotEmpty) {
    final List<int> imageBytes = File(chatMessage.medias.first.url!).readAsBytesSync();

    final responseStream = gemini.streamGenerateContent(
      text: chatMessage.text,
      images: [imageBytes],
    );

    responseStream.listen((event) {
      // Handle response from Gemini API
    });
  } else {
    final responseStream = gemini.streamGenerateContent(
      text: chatMessage.text,
    );

    responseStream.listen((event) {
      // Handle response from Gemini API
    });
  }
}
Handling Errors and Exceptions
Implement error handling to ensure your application runs smoothly despite any potential API issues:
void sendMessage(ChatMessage chatMessage) {
  setState(() {
    messages.insert(0, chatMessage);
  });

  try {
    // Existing API call logic
  } catch (error) {
    print("Error occurred: $error");
  }
}
Testing the Application
Testing with Text Prompts
Ensure that text-based interactions with the Gemini API work as expected. Send various queries and verify the responses are accurate and real-time.
Testing with Image Prompts
Check the application’s ability to handle image-based queries. Pick images and observe whether the Gemini API can accurately describe the images.
Limitations of the Gemini API
Understand that the Gemini API has a knowledge cutoff of April 2023. It cannot provide real-time information beyond this date.
Finalizing the Application
Checking for Any Remaining Issues
Before concluding, test the application thoroughly to identify any remaining issues. Address any bugs or performance issues to ensure a polished final product.
Potential Improvements and Future Features
Consider implementing additional features to enhance the user experience. Potential improvements include:
- Adding support for voice queries.
- Implementing user authentication.
- Enhancing error handling with user-friendly messages.
Resources and Further Reading
Here are some official documentation and resources for further reading:
By following this comprehensive guide, you will have a functional AI-powered chat application using Flutter and Google’s Gemini API. This application demonstrates the potential for integrating AI capabilities into mobile apps, paving the way for more innovative and interactive user experiences.
Get Source Code for free:
Conclusion
Congratulations! By following this guide, you’ve built a fully functional AI-powered chat app using Flutter and Google’s Gemini API. This project not only highlights the exciting possibilities of integrating AI into mobile apps but also demonstrates how you can create a more engaging and interactive user experience.
With features like text and image-based interactions, your app can handle a variety of user inputs, providing real-time responses and making the chat experience feel more dynamic and personalized. This is just the beginning—there are plenty of opportunities to further enhance your app, whether by adding voice queries, improving error handling, or incorporating user authentication.
This journey into AI-powered mobile development opens up a world of innovative possibilities. Keep experimenting and pushing the boundaries of what your app can do.
Happy coding!


Leave a Reply