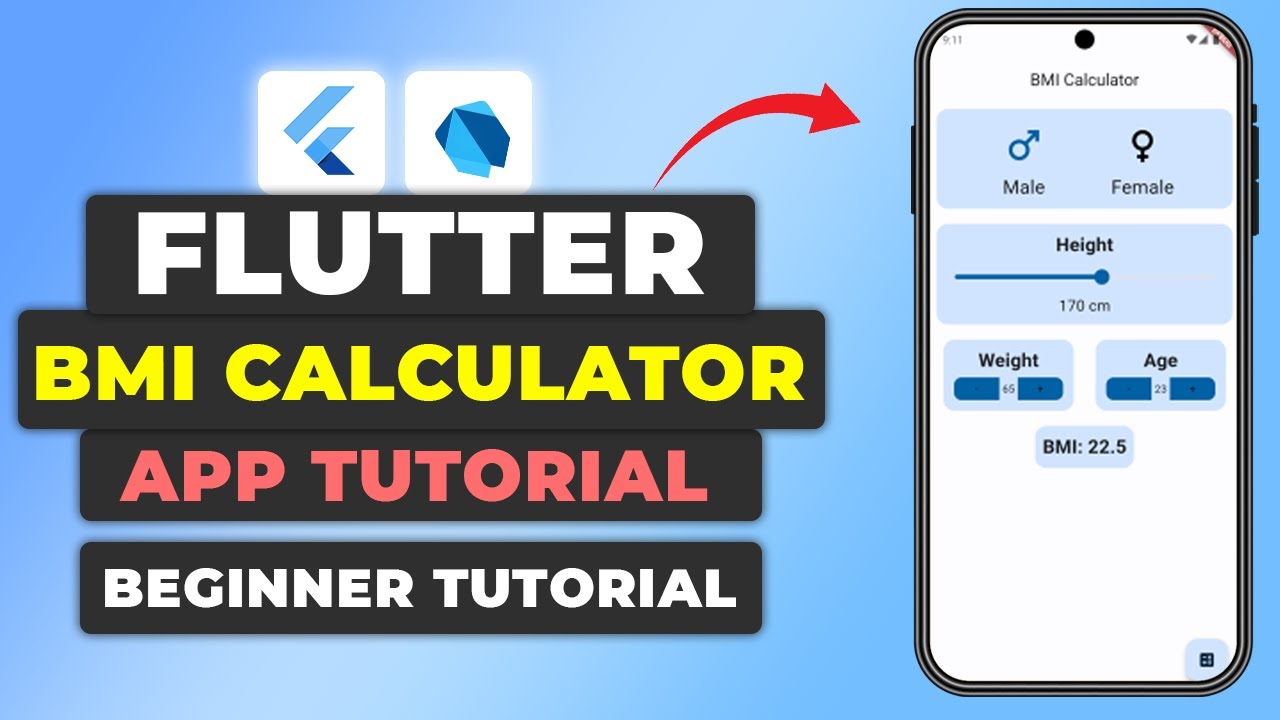
In this blog post, we’ll guide you through creating a BMI calculator app using Flutter, a popular framework for building beautiful, native interfaces for mobile, web, desktop, and embedded devices.
The app will allow users to:
- Select their gender (male or female)
- Input their height using a slider
- Input their weight using stepper buttons
- Calculate their BMI by clicking a button
If you prefer watching a video tutorial here is a link to that.
Getting Started
1. Create a new Flutter project:
- Open Android Studio and choose “New Flutter Project”.
- Name your project and select the Flutter SDK path.
2. Add the itemCount dependency:
Item_count_number_buttondependency is required for the stepper buttons used to input weight. You can find the link to the package in the video description below the blog post.- In your
pubspec.yamlfile, add the following line under thedependenciessection:
dependencies:
  flutter:
    sdk: flutter
  item_count_number_button: ^1.9.2
To download the dependency click here.
Run flutter pub get to get the depedency.
flutter pub getBuilding the User Interface (UI)
1. Create the State Class:
- This code defines a Flutter class named “HomePage” that inherits from “StatefulWidget”. It allows the HomePage to have a dynamic UI that can change. The
_HomePageStateclass will manage that dynamic behavior.
class HomePage extends StatefulWidget {
  const HomePage({super.key});

  @override
  State<HomePage> createState() => _HomePageState();
}
1. App Bar:
- Within the
buildfunction, return aScaffoldwidget. - Set the
appBarproperty of theScaffoldto anAppBarwidget with a centered title “BMI Calculator”.
Widget build(BuildContext context) {
  return Scaffold(
    appBar: AppBar(
      centerTitle: true,
      title: const Text("BMI Calculator"),
    ),
    ...
  );
}
2. Body with Column:
- Set the
bodyproperty of theScaffoldto aColumnwidget. This positions elements vertically.
Widget _buildUI() {
  return Column(
    children: [
      _genderSelector(),
      _heightInput(),
      _weightAndAgeInputRow(),
      _bmiResult(),
    ],
  );
}
Gender Selection
1. Gender Selector Function:
- Define a function called
genderSelectorthat returns aContainerwidget.
Widget _genderSelector() {
  return Container(
    decoration: BoxDecoration(
      color: Theme.of(context).colorScheme.primaryContainer,
      borderRadius: BorderRadius.circular(
        15,
      ),
    ),
    margin: const EdgeInsets.all(
      10.0,
    ),
    padding: EdgeInsets.symmetric(
      vertical: 10.0,
    ),
    ...
  );
}
2. Container with Row:
- The
Containerwill house the gender selection elements and have a blue background by default (depending on selected gender). - Nest a
Rowwidget inside theContainerto arrange the buttons horizontally.
 child: Row(
  mainAxisSize: MainAxisSize.max,
  mainAxisAlignment: MainAxisAlignment.spaceEvenly,
  crossAxisAlignment: CrossAxisAlignment.center,
  ...
),
3. Icon Buttons:
- Create two
IconButtonwidgets within theRow, one for male and one for female. - Set the
iconproperty of each button to the appropriate gender icon. - Assign an onPressed function to handle gender selection.
- Use a conditional statement to change the icon color based on the selected gender.
children: [
  Column(
    children: [
      IconButton(
        iconSize: 60,
        onPressed: () {
          setState(() {
            _selectedGender = 0;
          });
        },
        icon: Icon(
          Icons.male,
          color: _selectedGender == 0
              ? Theme.of(context).colorScheme.primary
              : Colors.black,
        ),
      ),
      const Text(
        "Male",
        style: TextStyle(
          fontSize: 25,
        ),
      ),
    ],
  ),
  Column(
    children: [
      IconButton(
        iconSize: 60,
        onPressed: () {
          setState(() {
            _selectedGender = 1;
          });
        },
        icon: Icon(
          Icons.female,
          color: _selectedGender == 1
              ? Theme.of(context).colorScheme.primary
              : Colors.black,
        ),
      ),
      const Text(
        "Female",
        style: TextStyle(
          fontSize: 25,
        ),
      ),
    ],
  )
Height Input
1. Height Input Function:
- Define a function called
heightInputthat returns aContainerwidget (same styling as gender selector).
Widget _heightInput() {
  return Container(
    decoration: BoxDecoration(
      color: Theme.of(context).colorScheme.primaryContainer,
      borderRadius: BorderRadius.circular(
        15,
      ),
    ),
    margin: const EdgeInsets.all(
      10.0,
    ),
    padding: EdgeInsets.symmetric(
      vertical: 10.0,
    ),
  );
}
2. Column for Height Display and Slider:
- Nest a
Columnwidget inside theContainer. - Add a
Textwidget to display the current height.
child: Column(
  children: [
    const Text(
      "Height",
      style: TextStyle(
        fontSize: 25,
        fontWeight: FontWeight.bold,
      ),
    ),
    ...
  ],
),
3. Slider for Height Selection:
- Add a
Sliderwidget to allow users to adjust their height. - Set the
valueproperty to the current height variable. - Implement the
onChangedcallback to update the height variable when the slider is moved.
Slider(
  min: 0,
  max: 300,
  divisions: 300,
  value: _height.toDouble(),
  onChanged: (value) {
    setState(
      () {
        _height = value.toInt();
      },
    );
  },
),
4. Text Widget for Height Value:
- Add another
Textwidget to display the current height value with units (cm).
Text(
  "$_height cm",
  style: const TextStyle(
    fontSize: 20,
  ),
)
Weight and Age Input
1. Weight and Age Input Row Function:
- Define a function called
weightAndAgeInputRowthat returns aRowwidget.
Widget _weightAndAgeInputRow() {
  return Row(
    mainAxisSize: MainAxisSize.max,
    mainAxisAlignment: MainAxisAlignment.spaceEvenly,
    crossAxisAlignment: CrossAxisAlignment.center,
    ...
  );
}
2. Row for Weight and Age Input:
- This
Rowwill hold the weight and age input widgets.
children: [
  _weightInput(),
  _ageInput(),
],
3. Weight Input Function:
- Define a function called
weightInputthat returns aContainerwidget (same styling).
Widget _weightInput() {
  return Container(
    decoration: BoxDecoration(
      color: Theme.of(context).colorScheme.primaryContainer,
      borderRadius: BorderRadius.circular(
        15,
      ),
    ),
    margin: const EdgeInsets.all(
      10.0,
    ),
    padding: EdgeInsets.symmetric(
      vertical: 10.0,
      horizontal: 10.0,
    ),
    ...
  );
}
4. Weight Display and Stepper Buttons:
- Similar to height input, create a
Textwidget to display weight andItemCountwidgets (stepper buttons) to adjust weight.
child: Column(
  children: [
    const Text(
      "Weight",
      style: TextStyle(
        fontSize: 25,
        fontWeight: FontWeight.bold,
      ),
    ),
    ItemCount(
      buttonSizeHeight: 30,
      buttonSizeWidth: 60,
      initialValue: _weight,
      minValue: 50,
      maxValue: 350,
      onChanged: (value) {
        setState(() {
          _weight = value.toInt();
        });
      },
      decimalPlaces: 0,
    ),
  ],
),
5. Age Input Function:
- Define a function called
ageInputsimilar toweightInput. - Use the
ItemCountwidget for age input as well.
Widget _ageInput() {
  return Container(
    decoration: BoxDecoration(
      color: Theme.of(context).colorScheme.primaryContainer,
      borderRadius: BorderRadius.circular(
        15,
      ),
    ),
    margin: const EdgeInsets.all(
      10.0,
    ),
    padding: EdgeInsets.symmetric(
      vertical: 10.0,
      horizontal: 10.0,
    ),
    child: Column(
      children: [
        const Text(
          "Age",
          style: TextStyle(
            fontSize: 25,
            fontWeight: FontWeight.bold,
          ),
        ),
        ItemCount(
          buttonSizeHeight: 30,
          buttonSizeWidth: 60,
          initialValue: _age,
          minValue: 1,
          maxValue: 100,
          onChanged: (value) {
            setState(() {
              _age = value.toInt();
            });
          },
          decimalPlaces: 0,
        ),
      ],
    ),
  );
}
BMI Result
1. BMI Result Function:
- Define a function called
bmiResultthat returns aContainerwidget (same styling).
Widget _bmiResult() {
  return Container(
    decoration: BoxDecoration(
      color: Theme.of(context).colorScheme.primaryContainer,
      borderRadius: BorderRadius.circular(
        15,
      ),
    ),
    margin: const EdgeInsets.all(
      10.0,
    ),
    padding: EdgeInsets.symmetric(
      vertical: 10.0,
      horizontal: 10.0,
    ),
    ...
  );
}2.Text Widget for BMI Display:
- Nest a
Textwidget inside theContainerto show the calculated BMI. - Use string interpolation to display the BMI value.
child: Text(
  "BMI: ${_bmi.toStringAsFixed(1)}",
  style: TextStyle(
    fontSize: 25,
    fontWeight: FontWeight.bold,
  ),
),
Calculating BMI
1. Button for Calculation:
- Add an ElevatedButton widget below the BMI result section.
- Set the onPressed property of the button to calculate the BMI.
- Implement the BMI formula: BMI = weight (kg) / height^2 (m).
floatingActionButton: FloatingActionButton(
  onPressed: () {
    setState(() {
      _bmi = _weight / pow(_height / 100, 2);
    });
  },
  child: const Icon(
    Icons.calculate,
  ),
),
Get Source Source for free:
Conclusion
This guide provides a basic structure for building a BMI app in Flutter. You can further enhance the app by:
- Implementing a reset button to clear user input.
- Adding visual cues for different BMI ranges (color change based on interpretation).
- Displaying additional health information based on the BMI interpretation.
- Implementing unit conversion for weight and height (kg/lb, cm/ft).
Happy Coding…!


Leave a Reply