Introducing the Power of Speech-to-Text in Flutter
In today’s digital landscape, where voice-based interactions are becoming increasingly prevalent, the ability to seamlessly integrate speech-to-text functionality into your mobile applications can be a game-changer. Flutter, the popular cross-platform framework, offers a robust solution for this with the help of the Speech to Text plugin. In this comprehensive guide, we’ll explore how to leverage this powerful tool to create a feature-rich voice recognition app for both iOS and Android platforms.
If you prefer watching a video tutorial on creating a speech-to-text app in Flutter here is a link to that.
Setting the Stage: Preparing Your Flutter Project
To get started, we’ll first need to set up our Flutter project and configure the necessary dependencies. Begin by creating a new Flutter project and removing the default MyHomePage class and its corresponding state class from the main.dart file. Next, create a new folder called “pages” and within it, a new file named “home_page.dart”. In this file, we’ll create a new stateful widget called “HomePage”.
class HomePage extends StatefulWidget {
  const HomePage({super.key});

  @override
  State<HomePage> createState() => _HomePageState();
}
Installing the Speech to Text Package
The crucial first step is to add the Speech to Text package to our project. Head over to pub.dev, the official Flutter package repository, and locate the speech_to_text package. Copy the dependency information and paste it into your project’s pubspec.yaml file.
dependencies:
  flutter:
    sdk: flutter
  speech_to_text: ^6.3.0
The speech_to_text library can be downloaded from here.
Once done, run flutter pub get to install the package.
flutter pub getConfiguring Platform-Specific Permissions
To ensure the proper functioning of the speech-to-text feature, we need to configure the necessary permissions for both iOS and Android platforms.
iOS Configuration
For iOS, navigate to the Runner/Info.plist file and add the following keys and their corresponding strings:
-
NSSpeechRecognitionUsageDescription– Explain why your app needs speech recognition access. -
NSMicrophoneUsageDescription– Explain why your app needs microphone access.
<key>NSSpeechRecognitionUsageDescription</key>

<key>NSMicrophoneUsageDescription</key>
Android Configuration
On the Android side, open the AndroidManifest.xml file located in the android/app/src/main directory. Add the following use-permission clauses within the <application> tag:
<uses-permission android:name="android.permission.RECORD_AUDIO"/>
<uses-permission android:name="android.permission.INTERNET"/>
<uses-permission android:name="android.permission.BLUETOOTH"/>
<uses-permission android:name="android.permission.BLUETOOTH_ADMIN"/>
<uses-permission android:name="android.permission.BLUETOOTH_CONNECT"/>
Additionally, in the app’s build.gradle file, ensure that the minSdkVersion is set to at least 21.
Implementing the Speech-to-Text Functionality
With the setup complete, let’s dive into the core functionality of our speech-to-text app. We’ll start by initializing the Speech to Text class and setting up the necessary state variables.
class _HomePageState extends State<HomePage> {
  final SpeechToText _speechToText = SpeechToText();

  bool _speechEnabled = false;
  String _wordsSpoken = "";
  double _confidenceLevel = 0;
  ...
}
Initializing the Speech to Text Class
In the HomePage class, create a final variable called _speechToText and initialize it with a new instance of the SpeechToText class. Then, override the initState() function and create an asynchronous function called _initSpeech(). This function will call _speechToText.initialize() and set the _speechEnabled state variable based on the result.
@override
  void initState() {
    super.initState();
    initSpeech();
  }

  void initSpeech() async {
    _speechEnabled = await _speechToText.initialize();
    setState(() {});
  }
Listening for Speech Input
Next, we’ll create an asynchronous function called _startListening(). This function will call _speechToText.listen() and pass it a callback function for the onResult event. This callback function, which we’ll call _onSpeechResult(), will be responsible for updating the UI with the transcribed words and the confidence level.
void _startListening() async {
  await _speechToText.listen(onResult: _onSpeechResult);
  setState(() {
    _confidenceLevel = 0;
  });
}

void _stopListening() async {
  await _speechToText.stop();
  setState(() {});
}
Controlling the Listening State
To allow the user to start and stop the speech recognition, we’ll add a Floating Action Button to the app. When the button is pressed, it will call either the _startListening() or _stopListening() function, depending on the current state of the speech recognition.
floatingActionButton: FloatingActionButton(
  onPressed: _speechToText.isListening ? _stopListening : _startListening,
  tooltip: 'Listen',
  child: Icon(
    _speechToText.isNotListening ? Icons.mic_off : Icons.mic,
    color: Colors.white,
  ),
  backgroundColor: Colors.red,
),
Displaying the Speech-to-Text Results
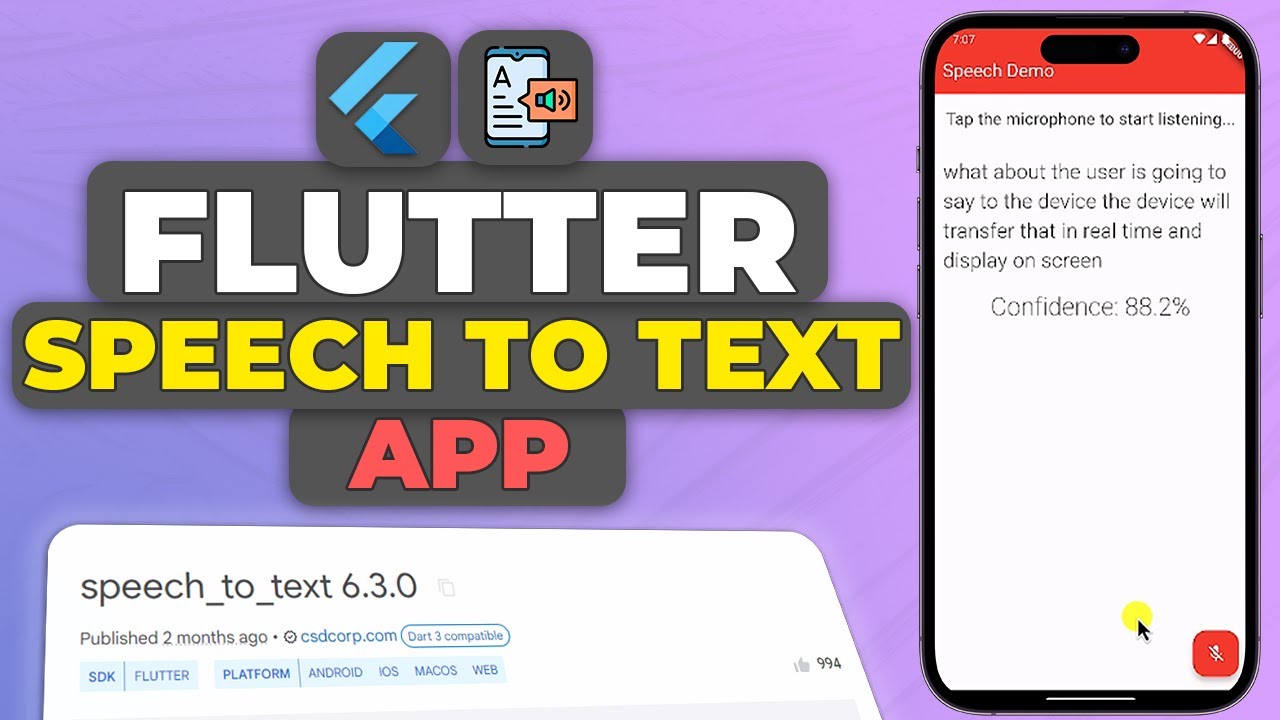
With the core functionality in place, let’s focus on presenting the transcribed words and the confidence level to the user in a clear and visually appealing manner.
  void _onSpeechResult(result) {
    setState(() {
    );
  }
Updating the UI with Transcribed Words
In the _onSpeechResult() function, we’ll update the _wordsSspoken state variable with the recognized words from the speech recognition result. This variable will then be used to display the transcribed text in the app’s body.
_wordsSpoken = "${result.recognizedWords}";Showing the Confidence Level
Additionally, we’ll create a _confidenceLevel state variable to store the confidence level of the speech recognition result. This value will be displayed alongside the transcribed words, allowing users to gauge the accuracy of the transcription.Putting It All Together: The Final App
_confidenceLevel = result.confidence;With the necessary components in place, let’s review the complete structure of our speech-to-text app:
void _onSpeechResult(result) {
  setState(() {
    _wordsSpoken = "${result.recognizedWords}";
    _confidenceLevel = result.confidence;
  });
}
The App Bar
At the top of the screen, we’ll display an App Bar with a title, providing a clear indication of the app’s purpose.The Speech Recognition Status
appBar: AppBar(
  backgroundColor: Colors.red,
  title: Text(
    'Speech Demo',
    style: TextStyle(
      color: Colors.white,
    ),
  ),
),
In the center of the screen, we’ll have a container that displays the current state of the speech recognition. This will inform the user whether the app is listening, ready to listen, or if the speech recognition is not available.
body: Center(
        child: Column(
          children: [
            Container(
              padding: EdgeInsets.all(16),
              child: Text(
                _speechToText.isListening
                    ? "listening..."
                    : _speechEnabled
                        ? "Tap the microphone to start listening..."
                        : "Speech not available",
                style: TextStyle(fontSize: 20.0),
              ),
            ),
            Expanded(
              child: Container(
                padding: EdgeInsets.all(16),
                child: Text(
                  _wordsSpoken,
                  style: const TextStyle(
                    fontSize: 25,
                    fontWeight: FontWeight.w300,
                  ),
                ),
              ),
            ),
            if (_speechToText.isNotListening && _confidenceLevel > 0)
              Padding(
                padding: const EdgeInsets.only(
                  bottom: 100,
                ),
                child: Text(
                  "Confidence: ${(_confidenceLevel * 100).toStringAsFixed(1)}%",
                  style: TextStyle(
                    fontSize: 30,
                    fontWeight: FontWeight.w200,
                  ),
                ),
              )
          ],
        ),
      ),
The Floating Action Button
The Floating Action Button will serve as the main control for the speech recognition. When tapped, it will either start or stop the listening process, depending on the current state.
floatingActionButton: FloatingActionButton(
  onPressed: _speechToText.isListening ? _stopListening : _startListening,
  tooltip: 'Listen',
  child: Icon(
    _speechToText.isNotListening ? Icons.mic_off : Icons.mic,
    color: Colors.white,
  ),
  backgroundColor: Colors.red,
),
The Transcribed Words and Confidence Level
Below the speech recognition status, we’ll display the transcribed words in a large, easy-to-read format. Additionally, we’ll show the confidence level of the speech recognition, allowing users to gauge the accuracy of the transcription.
Get Source Code for free:
Conclusion
Developing a real-time speech-to-text application in Flutter is not only feasible but also immensely rewarding. This guide has walked you through each step of the process, from setting up your Flutter environment to handling permissions and displaying real-time transcriptions. Whether for accessibility features, user convenience, or data entry efficiency, integrating speech-to-text capabilities in your applications opens up a myriad of possibilities. As technology continues to advance, the ability to seamlessly integrate human speech into our digital experiences will undoubtedly become standard practice, making skills in these areas more valuable than ever.


Leave a Reply