
In the rapidly evolving world of mobile app development, integrating real-time location and maps has become a standard for enhancing user experience. This detailed guide explains how to build a dynamic map application using Flutter, focusing on the integration of the Google Maps API, handling user locations, and drawing routes between points of interest. We’ll use the google_maps_flutter package alongside other essential packages like location and polyline_points to achieve a fully functional map application similar to commercial navigation apps.
If you prefer watching a video tutorial on integrating Google Maps in Flutter here is a link to that.
Setting up Your Flutter Project
To start, create a new Flutter project by running flutter create your_project_name in your terminal. Once the project is initialized, clean up the default boilerplate by deleting the existing code in the main.dart file. For better organization, create a new directory under lib called pages and within that, add a new Dart file named map_page.dart. In this new file, define a stateful widget, MapPage, which will later manage the state of our map.
class MapPage extends StatefulWidget {
  const MapPage({super.key});

  @override
  State<MapPage> createState() => _MapPageState();
}
Integrating Google Maps
Preparing Google Maps Integration
To use Google Maps in Flutter, add the google_maps_flutter package to your pubspec.yaml at the dependencies section. Next, an API key is essential for accessing the full capabilities of Google Maps. Visit the Google Cloud Platform, create a new project, and enable the Google Maps API under the credentials section to obtain your key.
dependencies:
  google_maps_flutter: ^2.2.7
Run flutter pub get to download and install the package.
The google_maps_flutter library can be downloaded from here.
Visit the Google Cloud Platform, create a new project, and enable the Google Maps API under the credentials section to obtain your key.
Setting Up Android and iOS
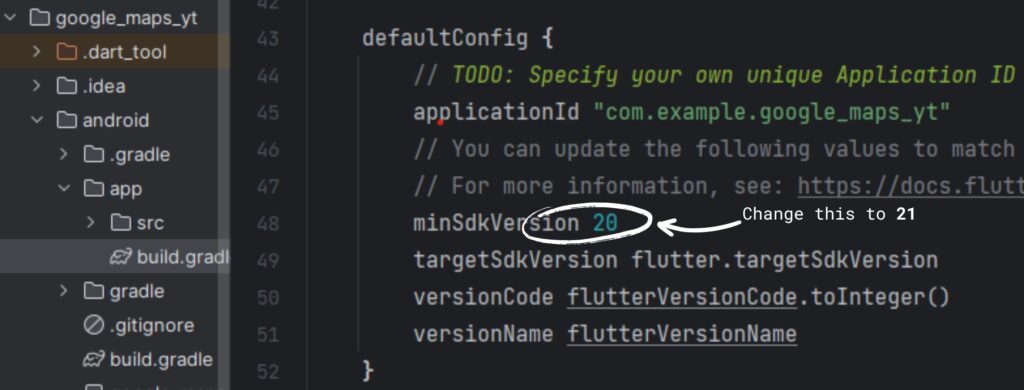
For Android, go to android/app/build.gradle and change the minimun SDK version to 21.
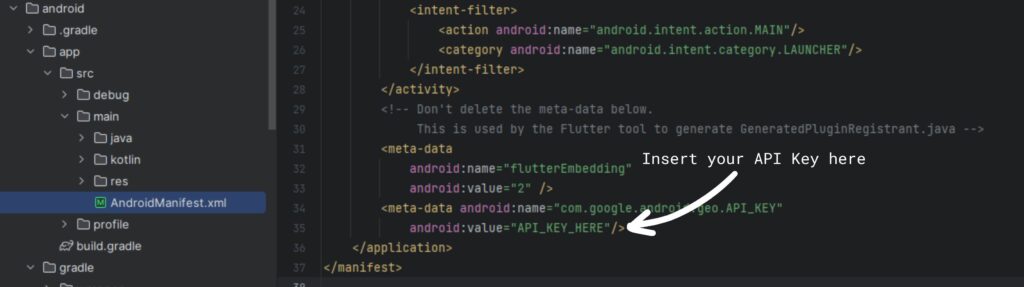
Secondly, you need to change you need to update your AndroidManifest.xml file located in android/app/src/main. Include your Google Maps API key here by inserting a meta-data element within the application tag.
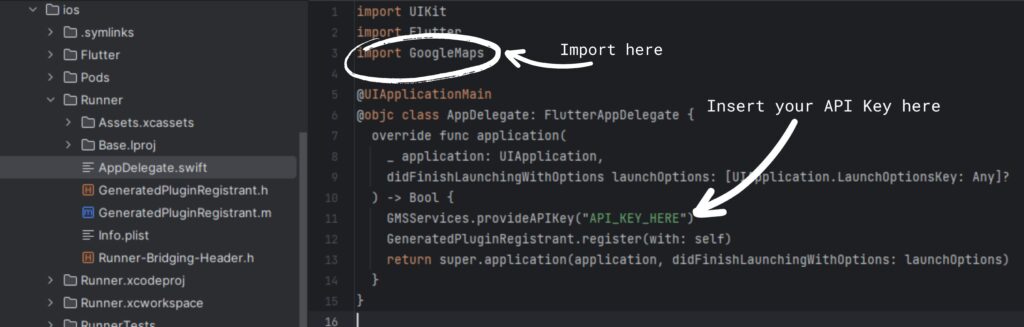
For iOS, integration involves adjusting the AppDelegate.swift file. Import GoogleMaps at the top, and within the application() function, initialize the GoogleMaps with the API key. Modify your info.plist to add location usage descriptions to ensure the app can request location permissions.
Displaying the Map
Initialize a CameraPosition targeting a specific location, for example, Google’s headquarters in San Francisco. Embed the GoogleMap widget within the Scaffold widget of map_page.dart. Set the map’s initial camera position to focus on the desired location, and adjust the zoom level to your preference.
import 'package:google_maps_flutter/google_maps_flutter.dart';

class MapPage extends StatefulWidget {
  @override
  State<MapPage> createState() => _MapPageState();
}

class _MapPageState extends State<MapPage> {
  final CameraPosition _initialCameraPosition = CameraPosition(
    target: LatLng(37.4223, -122.0848), // Google's headquarters
    zoom: 13,
  );

@override
  Widget build(BuildContext context) {
    return Scaffold(
      body: _currentP == null
          ? const Center(
              child: Text("Loading..."),
            )
          : GoogleMap(
              onMapCreated: ((GoogleMapController controller) => _mapController.complete(controller)), initialCameraPosition: CameraPosition(
                target: _pGooglePlex,
                zoom: 13,
              ),
      ...
  }
}
Adding Location Markers
Markers are graphical icons on the map representing points of interest. Define multiple markers, perhaps for notable landmarks like Googleplex and Apple Park. For each marker, specify the latitude and longitude, a unique marker ID, and choose an icon. Flutter’s Marker object is used here to manage these properties.
markers: {
  Marker(
    markerId: MarkerId("_currentLocation"),
    icon: BitmapDescriptor.defaultMarker,
    position: _currentP!,
  ),
  Marker(
    markerId: MarkerId("_sourceLocation"),
    icon: BitmapDescriptor.defaultMarker,
    position: _pGooglePlex
  ),
  Marker(
    markerId: MarkerId("_destionationLocation"),
    icon: BitmapDescriptor.defaultMarker,
    position: _pApplePark
  )
},
Tracking User Location in Real-Time
Installing the Location Package
To access the device’s geographical location dynamically, integrate the location package into your Flutter project. Update pubspec.yaml to include this new dependency.
dependencies:
  location: ^5.0.0
Run flutter pub get to download and install the package.
The location library can be downloaded from here.
Managing Permissions
Update your Android and iOS project files to request location permissions.
For Android
Adjust the AndroidManifest.xml by adding the required permissions.
<uses-permission android:name="android.permission.FOREGROUND_SERVICE" />
<uses-permission android:name="android.permission.ACCESS_BACKGROUND_LOCATION"/>
For iOS
Modify your info.plist file to include permission requests for location services.
<string>NSLocationWhenInUseUsageDescription</string>
<key>Location Access Required To Track User</key>
<string>Main</string>
<key>Location Access Required To Track User</key>
Implementing Location Updates
Build a function to handle real-time location updates. This function should check if location services are enabled, request permissions if not, and then continuously fetch and update the location data. Utilize the Location class provided by the location package to access these functionalities.
Reactive User Location Display on the Map
To enhance user interaction, ensure the map viewport updates as the user’s location changes. Create a GoogleMapController to manage camera positioning dynamically. Implement a method that adjusts the camera to center on the user’s current location whenever it changes. This interaction creates a seamless experience, similar to navigation software.
1. Initialization and Setup:
Location _locationController = new Location();

@override
  void initState() {
    super.initState();
    getLocationUpdates().then(
      (_) => {
        getPolylinePoints().then((coordinates) => {
              generatePolyLineFromPoints(coordinates),
            }),
      },
    );
  }
2. Function to Get Location Updates:
Future<void> getLocationUpdates() async {
    bool _serviceEnabled;
    PermissionStatus _permissionGranted;

    _serviceEnabled = await _locationController.serviceEnabled();
    if (_serviceEnabled) {
      _serviceEnabled = await _locationController.requestService();
    } else {
      return;
    }

    _permissionGranted = await _locationController.hasPermission();
    if (_permissionGranted == PermissionStatus.denied) {
      _permissionGranted = await _locationController.requestPermission();
      if (_permissionGranted != PermissionStatus.granted) {
        return;
      }
    }

    _locationController.onLocationChanged
        .listen((LocationData currentLocation) {
      if (currentLocation.latitude != null &&
          currentLocation.longitude != null) {
        setState(() {
          _currentP =
              LatLng(currentLocation.latitude!, currentLocation.longitude!);
          _cameraToPosition(_currentP!);
        });
      }
    });
  }
3. Function to Move Camera to User’s Position:
Future<void> _cameraToPosition(LatLng pos) async {
    final GoogleMapController controller = await _mapController.future;
    CameraPosition _newCameraPosition = CameraPosition(
      target: pos,
      zoom: 13,
    );
    await controller.animateCamera(
      CameraUpdate.newCameraPosition(_newCameraPosition),
    );
  }
Drawing Routes Between Locations
To connect markers with a visual path, use the polyline_points package. This involves fetching direction data from the Google Maps Directions API between your markers. Translate this data into a series of coordinates that define a polyline.
dependencies:
  flutter_polyline_points: ^2.0.0
Run flutter pub get to download and install the package.
The polyline_pointslibrary can be downloaded from here.
Generating Polyline Data
Create a function that requests route data between two points, formats the response into usable polyline data, and updates the map display accordingly. Ensure each segment of the route is marked clearly and accurately, reflecting real-time location changes and pathfinding.
 Future<List<LatLng>> getPolylinePoints() async {
    List<LatLng> polylineCoordinates = [];
    PolylinePoints polylinePoints = PolylinePoints();
    PolylineResult result = await polylinePoints.getRouteBetweenCoordinates(
      GOOGLE_MAPS_API_KEY,
      PointLatLng(_pGooglePlex.latitude, _pGooglePlex.longitude),
      PointLatLng(_pApplePark.latitude, _pApplePark.longitude),
      travelMode: TravelMode.driving,
    );
    if (result.points.isNotEmpty) {
      result.points.forEach((PointLatLng point) {
        polylineCoordinates.add(LatLng(point.latitude, point.longitude));
      });
    } else {
      print(result.errorMessage);
    }
    return polylineCoordinates;
  }

  void generatePolyLineFromPoints(List<LatLng> polylineCoordinates) async {
    PolylineId id = PolylineId("poly");
    Polyline polyline = Polyline(
        polylineId: id,
        color: Colors.black,
        points: polylineCoordinates,
        width: 8);
    setState(() {
      polylines[id] = polyline;
    });
  }
Testing the Application on Simulators
Deploy your application to Android and iOS simulators. Check for any platform-specific issues, such as architectural mismatches on newer Mac devices. Debug and optimize the performance to ensure the application runs smoothly across different devices.
Get Source Source for free:
Conclusion
Integrating Google Maps in Flutter to track and display real-time locations offers significant benefits in building interactive, user-friendly mobile applications. By following this guide, developers can integrate comprehensive mapping functionalities into their applications, enhancing user engagement and providing valuable contextual information that leverages geographic data effectively. As mobile technology continues to evolve, the integration of advanced mapping solutions will play a pivotal role in defining the next generation of interactive app experiences.


Leave a Reply